Your Cart is Empty


Jon Boat Subfloor & Interior Build: Transforming a 1436 into a Jon Yacht
Key Takeaways
- Transform Your Jon Boat Into a Jon Yacht, A simple 1436 Jon Boat can be upgraded into a stylish and functional Jon Yacht with proper planning, construction, and finishing touches.
- Inspect and Prepare the Hull, A strong, watertight aluminum hull is essential. Repair dents, seal leaks, and remove old components before installing a new boat subfloor or interior.
- Plan the Layout for Your Needs, Whether fishing, hunting, or exploring, consider weight distribution, storage, and seating when designing your Jon Boat layout.
- Build a Durable Boat Subfloor, Choosing the right materials like marine plywood, exterior plywood, or aluminum sheets ensures stability, flotation, and longevity. Proper sealing with marine epoxy or polyurethane protects against moisture.
- Install Functional and Stylish Boat Flooring, Options like EVA foam decking, marine carpet, or aluminum tread plate enhance comfort, traction, and aesthetics. Ensure proper alignment, sealing, and drainage.
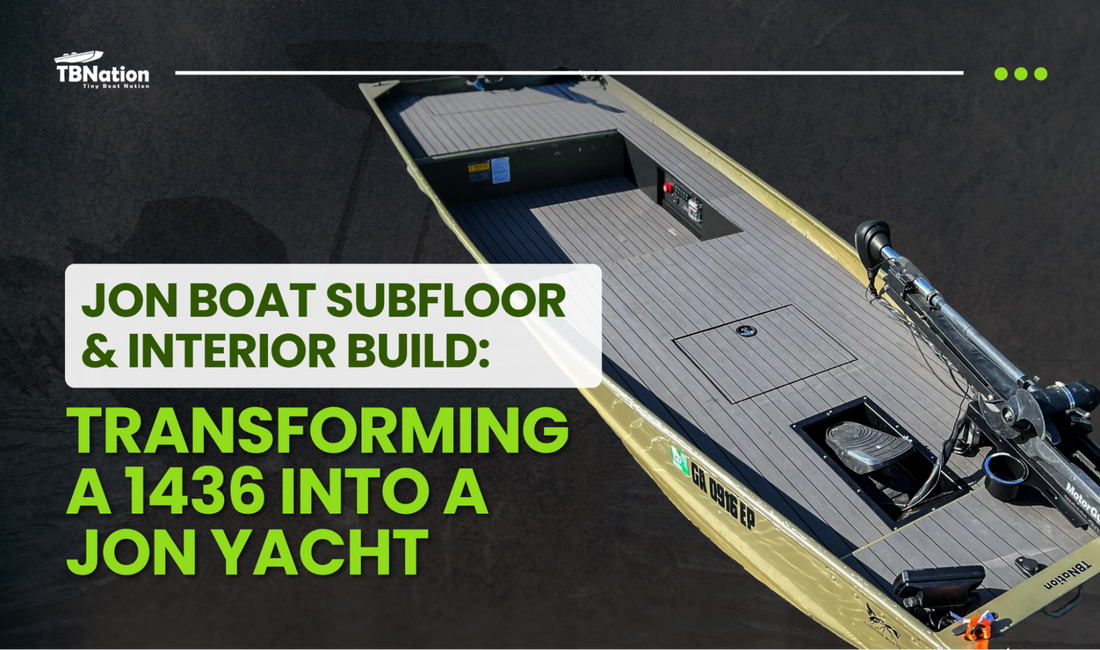
Turning a modest Jon Boat into a refined and comfortable watercraft, often nicknamed a “Jon Yacht”, is one of the most rewarding DIY boating projects you can take on. Whether you’re working with a 1436 model or a similar size, the goal is to elevate a basic aluminum hull into a personalized vessel with upgraded boat subfloor, stylish boat flooring, and a functional boat interior that meets your needs.
This guide covers every step of the Jon Boat build, from planning your layout to finishing touches, while keeping SEO-friendly keywords naturally integrated throughout.
Planning Your Jon Boat Build
Inspect and Prepare the Hull
Begin by thoroughly cleaning the Jon Boat and removing any old paint, rivets, benches, or damaged flooring. Inspect the ribs and bottom for dents, corrosion, or loose rivets, and repair or seal any leaks to ensure the hull is strong and watertight. A solid, dry foundation is essential before adding a new subfloor or structural components.
Design the Layout
Plan the boat layout based on how you intend to use it, fishing, hunting, or exploring, since each requires different configurations. Most builds include a raised front casting deck, middle storage compartments or seating, and a rear platform for motor and battery placement. Sketch your design or use layout software, keeping weight distribution in mind to maintain proper balance and performance.
Step-by-Step Process: Building the Subfloor & Interior
Step 1: Prepare the Hull

Remove all bench seats and interior components, and repair or replace the transom if needed. Install the main interior framing using wood, aluminum, or a hybrid structure to support the new layout. Finish by covering the interior hull with pink foam sheets for flotation and leveling.
Step 2: Build Flush-Fitting Deck Panels

Measure the openings for the plastic hatches and cut wood panels that match the hatch thickness so they sit completely flush. Test-fit the entire deck layout to ensure the panels align evenly. Make any trimming adjustments before moving on to sealing.
Step 3: Seal, Repair, and Paint the Wood Panels

Seal the panels using either thinned oil-based enamel or marine-grade epoxy resin rolled on until glossy. Once cured, inspect the edges for damage, fill any chips or voids with thickened epoxy or putty, and sand the repairs smoothly. Lightly sand the panels and spray them with gloss paint, focusing on exposed edges for a clean finish.
Step 4: Convert Old Bench Seats into Structural Supports

Cut the aluminum from the removed bench seats into straight or angled rib pieces. Install these modified ribs inside the hull to create strong, flat mounting points. Attach the sealed and painted subfloor panels to these supports with self-tapping screws for a solid base.
Step 5: Prepare and Line Compartments

Seal off the forward compartment to create a foam cavity and add wood or aluminum boundaries while keeping space for wiring conduits. Cut recycled aluminum to form side flooring panels or foam-retaining brackets and install them along the inner compartments. Confirm all interior surfaces are ready for EVA foam installation.
Step 6: Install Interior Flooring and Frame the Catwalks

Cut and adhere EVA foam to the compartment floors before the main deck is installed, using leftover foam in hidden areas when possible. Determine the catwalk layout and frame them using wood or square aluminum tubing while leaving flotation pockets and routing flex-hose conduits for wiring. Finish by installing the subfloor panels, aligning all edges, completing the deck framing, and preparing templates for final turf application.
Mastering Weight Distribution & Layout
One of the most overlooked "boulders" in a 1436 build is how the interior layout affects performance. Because the 1436 is a narrower hull, every pound counts toward your center of gravity. When planning your build, map out your seating and battery placement before securing your subfloor. A common mistake is placing all the "heavy" items—like fuel and batteries, in the rear, which can cause the bow to ride too high and ruin your plane.
- Pro Tip: Keep your batteries mid-ship if possible to balance the weight of the outboard.
- Deck Height: Keep your casting deck low enough to maintain stability but high enough to allow for dry storage underneath.
Maximizing Storage with Structural Hatches
Once your subfloor is in place, the next step is transforming that empty space into functional storage. Using the right materials for your Jon boat to bass boat conversion ensures that your deck remains rigid and your gear stays dry. When cutting openings for hatches, always reinforce the perimeter with aluminum angle to prevent the plywood or aluminum decking from flexing over time.
- Keyword Focus: Use "flush-mount hatches" to keep the deck clean and "trip-free."
- Material Choice: If you’re using wood, ensure the edges of your cutouts are double-sealed with resin to prevent rot from the inside out.
Gas vs. Electric: Choosing Your Propulsion Boulder
Propulsion is a "Core Pillar" of any Tiny Boat build. Since many 1436 owners are moving toward electric-only lakes or looking for weight savings, adding a technical comparison section will catch "Electric Jon Boat" search traffic.
What to add:
- The 3HP Benchmark: Explain that a 1kW electric motor (like the ePropulsion Spirit 1.0 Plus) provides thrust comparable to a 3HP gas outboard.
- Weight Savings for the 1436: A 1436 is a weight-sensitive hull. Highlight that a Spirit 1.0 Plus setup weighs only 42 lbs total, whereas a traditional 24V trolling motor setup with AGM batteries can weigh up to 128 lbs.
- Transom Height Warning: Remind builders to measure their actual transom height before buying; for example, a standard 15.5" transom typically requires an Extra Short (XS) ePropulsion shaft to keep the prop in the "target zone" (even with the hull bottom to 2" below).
Building the Boat Subfloor
The subfloor is the heart of your Jon Boat build. It’s the structural foundation that supports your weight, adds stability, and protects the hull.
Choosing the Right Material
- Marine plywood -Ideal for durability and water resistance.
- Exterior plywood -A cheaper alternative, perfect when properly sealed with epoxy or polyurethane.
- Aluminum sheets - Lightweight and corrosion-resistant, though pricier and harder to work with.
Installing the Subfloor
- Measure and cut panels - to fit between the ribs of your Jon Boat. A tight fit ensures minimal flex.
- Add foam insulation - beneath the panels. Closed-cell foam provides flotation, reduces vibration, and dampens noise.
- Seal the wood - thoroughly using marine epoxy or spar urethane. This step prevents rot and extends the subfloor’s life.
- Secure the panels - using stainless screws or rivets. Keep drainage channels open so water can still flow to the bilge.
Installing the Boat Flooring
After completing the subfloor, it’s time to add the top layer, your boat flooring. This stage defines the final look and feel of your Jon Boat interior.
Flooring Options
- Marine carpet - Soft, affordable, and noise-reducing. Great for anglers who want traction underfoot.
- EVA foam decking -Lightweight, slip-resistant, and stylish. Easy to install with adhesive backing and available in many patterns.
- Aluminum tread plate -The most rugged and long-lasting option, ideal for heavy-duty or hunting Jon Boats.
Installation Process
- Dry fit your flooring -to ensure proper alignment before gluing or screwing.
- Seal all edges and screw holes - to prevent water intrusion.
- Add drainage gaps -along the sides to avoid pooling water.
- Test stability - by walking on each section before final installation.
Upgrading the Boat Interior
Building Storage and Deck Space
Use the subfloor as a foundation to add custom storage boxes, rod lockers, and a raised casting deck. Under-deck compartments help organize gear while keeping weight low and balanced for better stability. A front deck also provides a standing platform for fishing, improving both comfort and functionality. This setup gives your Jon Boat a professional and efficient layout.
Adding Comfort and Features
Enhance your boat’s usability with comfort upgrades such as pedestal or swivel seats, LED interior lighting, and cup holders. For avid anglers, include mounts for trolling motors, fish finders, and rod racks, while concealing wiring under the subfloor for a clean appearance. These additions make the boat safer, more convenient, and truly customized to your needs. They also elevate the overall experience of using your Jon Boat.
Finishing Touches and Protection
Protect and refine your boat by applying marine-grade paint or a non-slip coating to floors and interior surfaces. Seal all exposed wood edges to prevent moisture damage and ensure the flooring system lasts for years. Run all wiring neatly beneath the subfloor, using waterproof connectors and conduits to prevent corrosion, and consider adding USB outlets, switch panels, or LED strips for modern functionality.
From Utility to Luxury: Turning Your Jon Boat into a DIY Jon Yacht

Transforming a basic Jon Boat into a stylish and comfortable Jon Yacht is one of the most rewarding DIY projects for boating enthusiasts. With a properly sealed boat subfloor, durable boat flooring, and a well-planned interior, even a modest 1436 model can feel custom-built. From added storage compartments to upgraded seating and EVA foam flooring, each step elevates your boat’s functionality and comfort. With patience and creativity, your humble aluminum hull can become a vessel that rivals larger boats in both style and performance.
Conclusion: From Simple Jon Boat to Custom Jon Yacht
Transforming a 1436 Jon Boat into a capable Jon Yacht is not just about looks; it is about creating a more stable, comfortable, and efficient vessel that suits your lifestyle. By focusing on a properly sealed boat subfloor, durable boat flooring, and a practical yet attractive boat interior, you can turn a simple aluminum hull into something that feels custom-built.
With the right planning, patience, and attention to detail, your Jon Boat build can easily rival larger boats in functionality and comfort while keeping its small-boat charm. A humble Jon Boat may start as a basic utility craft, but with a little ingenuity, it becomes something far more impressive: your very own Jon Yacht.
Frequently Asked Questions
1: What is a Jon Yacht?
A Jon Yacht is a customized and upgraded Jon Boat, often enhanced with a new boat subfloor, stylish boat flooring, and a functional boat interior to improve comfort, stability, and usability.
2: What materials are best for a Jon Boat subfloor?
Marine plywood is ideal for durability and water resistance. Exterior plywood can be used if sealed properly, and aluminum sheets provide a lightweight, corrosion-resistant alternative.
3: How do I choose the right flooring for my Jon Boat?
Options include marine carpet for comfort and noise reduction, EVA foam decking for lightweight, slip-resistant surfaces, and aluminum tread plate for heavy-duty use. Your choice depends on intended use and budget.
4: Can I add storage and raised decks to a 1436 Jon Boat?
Yes! Using the subfloor as a foundation, you can add custom storage boxes, rod lockers, and raised casting decks while maintaining balance and flotation.
5: How do I protect my Jon Boat interior from water damage?
Seal all wood edges with marine-grade epoxy or urethane, apply non-slip coatings to flooring, and use waterproof wiring connectors for any electrical upgrades.


Recent Posts


Please select the Blog in the settings on the right sidebar to display it
Join Our VIP List
Join the Tiny Boat Nation VIP Members List.
It's Free! Stay Up To Date With Announcements, Product Give Aways, News and Promotions.